
Introduction
I've always been fascinated with the inner workings of programming languages and how code is interpreted or compiled. One important component of language interpretation or compilation is the lexer, also known as a tokenizer.
In this article, we'll start by familiarizing ourselves with the concept of a lexer and its role in programming and move on to the action of actually writing our simple lexer from scratch without relying on third-party tools.
If this topic seems terrifying to you, or you think that writing your own lexer is beyond your skills, fear not! Having a basic programming understanding and a curiosity to learn is all you need to get started. If you actually read the whole article without skipping sections and paragraphs, I promise you'll be able to write your own lexer by the end.
I suggest grabbing a cup of coffee, opening your favorite text editor, and let's dive in.
On the surface they look deceptively simple: text goes in and something comes out. They are programs that take other programs as their input and produce something. Simple, right? But the more you think about it, the more fascinating it becomes. Seemingly random characters - letters, numbers and special characters - are fed into the interpreter and suddenly become meaningful. The interpreter gives them meaning! It makes sense out of nonsense. And the computer, a machine that’s built on understanding ones and zeroes, now understands and acts upon this weird language we feed into it - thanks to an interpreter that translates this language while reading it.
![Thorsten Ball]()
Thorsten Ball (Software engineer and books author)

Understanding Lexers and Tokenizers
Firstly, let's memorize that lexers and tokenizers are interchangeable terms. Meaning that a lexer is essentially a tokenizer. It's like a language translator that takes a stream of characters as input and breaks it down into meaningful units called tokens. We'll start by defining our tokens in the next section, and then move on to implementing our lexer to identify and extract these tokens from a given input.
We usually feed a string of characters to the lexer, and it processes it character by character to identify patterns such as white spaces, symbols, keywords, and identifiers. For example, if we feed a string x + 5 = 10 to our lexer, it will produce tokens like the following:
[
  {
    "type": "IDENT",
    "literal": "x"
  },
  {
    "type": "PLUS",
    "literal": "+"
  },
  {
    "type": "INT",
    "literal": "5"
  },
  {
    "type": "EQUAL",
    "literal": "="
  },
  {
    "type": "INT",
    "literal": "10"
  }
]
This output is in JSON format, but the tokens can be represented in any format that makes sense for your application. For example, in typed programming languages, tokens are often represented as objects with specific attributes, such as type and value.
Let's go ahead and start by defining our tokens.
Before we begin
To make things simple, we are going to use JavaScript to write our own lexer. Not the best choice since JavaScript doesn't have types like other languages, but it will serve our purpose here since we are building just a lexer and not a full programming language. It doesn't matter whether you use Node, Deno or Bun, all you need is a basic understanding of JavaScript syntax. I'll use Node.js, so if you are using something else, your code will be mostly the same.
Our goal for this article will be to build a Lexer that can tokenize a basic arithmetic expression like:
x = 42;
y = 3;
x + y == 45;
We'll have tokens such as numbers, operators, identifiers, semicolons, assign, and the equals sign. All the whitespace will be ignored by our lexer, which means that we can write something like 262 / y == 131 ; and our lexer will still be able to tokenize it correctly.
To make sure that our lexer works correctly, we'll write some tests to verify its functionality and make sure that we don't break anything.
Creating Tokens
There are different ways of creating tokens in a lexer, some developers use Regular Expressions (regex) to match patterns, while others use a more manual approach by looping through each character and building tokens. I'm going to show you the second approach, as it gives you more flexibility and control over the tokenization process.
I'll start by creating a src/tokenTypes.js file that will contain all the token types that our Lexer will support:
// tokenTypes.js

module.exports = {
    ILLEGAL: "ILLEGAL", // Illegal token type
    EOF: "EOF", // End of line
    INT: 'INT', // Integer
    IDENT: 'IDENT', // Identifiers
    SEMI: ';',
    PLUS: '+',
    MINUS: '-',
    MULTIPLY: '*',
    DIVIDE: '/',
    ASSIGN: '=',
}
These types are necessary for the lexer to correctly identify and categorize different elements in the input code. Since JavaScript doesn't have ENUM types, we use a simple object with key-value pairs to represent our token types.
In programming languages that have ENUMs it would look something like this:
enum TokenType {
  ILLEGAL,
  EOF,
  INT,
  IDENT,
  PLUS,
  MINUS,
  MULTIPLY,
  DIVIDE,
  ASSIGN,
  SEMI
}
But, it doesn't really matter in our case since we're using JavaScript and can achieve the same result with an object. Now that we have defined our token types, let's move on to creating the src/Token.js file with a simple Token class:
// src/Token.js

module.exports = class {
    /**
     * @param {string} type Token type (e.g. tokens.INT, tokens.PLUS)
     * @param {string} literal Token literal (e.g. '3', '+')
     */
    constructor(type, literal) {
        this.type = type
        this.literal = literal
    }
}
As demonstrated by the comment block above, the first parameter of the constructor function in the Token class is the token type that we defined in the tokenTypes.js file, and the second is just a literal representation of the token. If I want to create tokens for this string: 5;, I would do this:
// tokenTypes.js

const tokens = [
  new Token(tokens.INT, '5'),
  new Token(tokens.SEMI, ';'),
]
But we want to dynamically generate tokens based on the input code, so we need to build our Lexer class.
Creating a Lexer
Creating a lexer is an essential step in building a compiler or interpreter. Our lexer will be a JavaScript class that accepts a string as input and tokenizes it into a stream of tokens with the nextToken method.
The nextToken method returns the next token in the stream. It means that every time you call this method on the lexer object, it will return the next token in the input code. This is important to understand that lexer doesn't return the entire stream of tokens at once, but instead, it returns them one by one as you request them.
I'm going to create a src/Lexer.js file with this boilerplate for now:
// src/Lexer.js

const tokens = require('./tokenTypes')
const Token = require('./Token')

module.exports = class {
  constructor(input) {
    this.input = input
  }

  nextToken() {
    return new Token(tokens.INT, this.input)
  }
}
For now, our nextToken method always returns the integer token. But don't worry, we'll improve it as we go along, but for now, I just want to make the Lexer work for at least one scenario when our input is just a string with any number like '3' or '245'. Let's write a test that passes when the input is 3.
Testing Lexer
As for testing with Node.js, I'll create a __tests__ directory inside the project root and create a Lexer.test.js file inside it with a single test case:
// __tests__/Lexer.test.js

const tokens = require('../src/tokenTypes')
const Token = require('../src/Token')

module.exports = [
  {
    input: '3',
    expect: [new Token(tokens.INT, '3')],
  },
]
We want to make sure that when the input is '3', our Lexer correctly tokenizes it into a single token with the type INT and value '3'. Simple and straightforward, right?
Since we are not using any external libraries for our Lexer, let's create another file that will contain our test runner. It's going to be a __tests__/index.js file with this code:
// __tests__/index.js

const assert = require('assert')
const Lexer = require('../src/Lexer')
const lexerTests = require('./Lexer.test')

lexerTests.forEach(testCase => {
    const lex = new Lexer(testCase.input)

    testCase.expect.forEach(expectedToken => {
        assert.deepEqual(lex.nextToken(), expectedToken)
    })
})

console.info('\x1b[42m', 'All tests are passed!')
We just import Lexer's tests from Lexer.test.js and iterate over each test case to make sure that our Lexer correctly tokenizes the input as expected. After running node __tests__ we should get “All tests are passed!” in the console.
Now that we have our basic setup in place, let's add another test case to check if it passes with the input 1001; with a semicolon:
// __tests__/Lexer.test.js

module.exports = [
  // [...]
  {
    input: '1001;',
    expect: [
      new Token(tokens.INT, '1001'),
      new Token(tokens.SEMI, ';'),
    ],
  },
]
Tests fail because we expect { type: 'INT', literal: '1001' }, but get { type: 'INT', literal: '1001;' }. It means that we need to implement the correct parsing logic in our Lexer, instead of always returning the same hard-coded token type.
Implementing the Lexer
To make a Lexer tokenize inputs like '2463;' or '124;' we need to update our Lexer implementation. The way it's going to work is pretty simple - we will initialize our Lexer with the input string and keep track of the current position in the string. Let's say we want to tokenize the input string 123;.
When we initialize our Lexer, we'll have 2 pointers to keep track of the current position - one for the current character ('1' in the string) and one for the next character ('2' in the string).
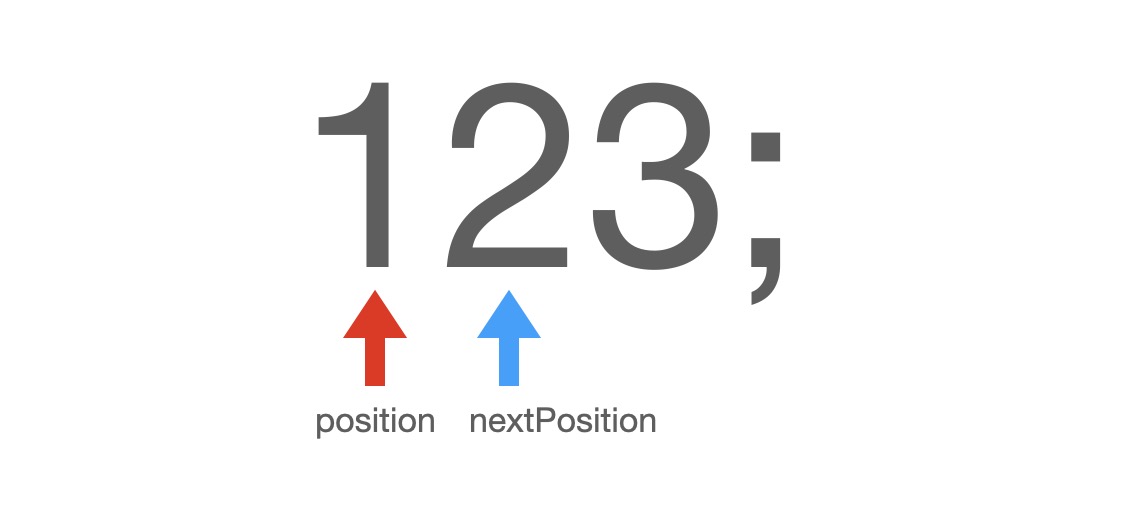
If the current position points to a number, we will memorize the current position in the string (index 0) and keep moving forward until the next token is a non-digit character.
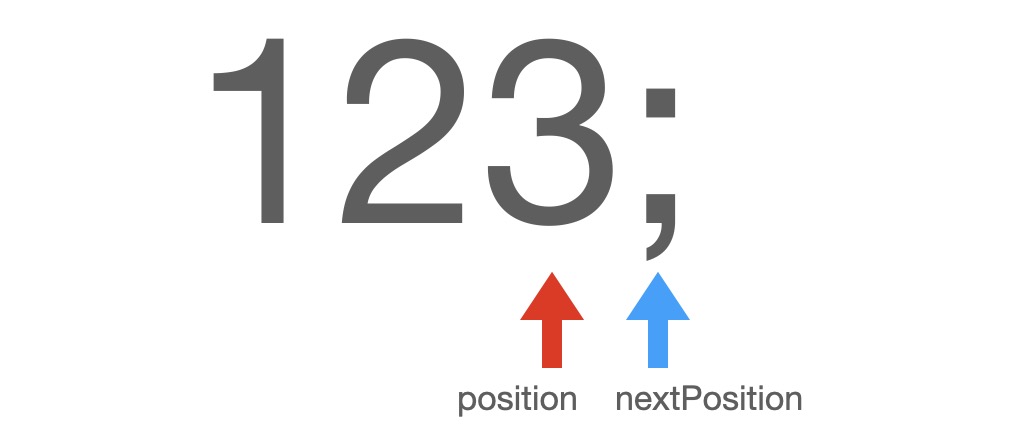
At this point, our next position is not a digit character (it's a semicolon), which means that everything from index 0 to index 2 (the current position) is a number token.
Tokenizing a semicolon is simple because it's always a single-character token like "+", "-", "*" and so on. Let's implement this logic in our Lexer class by adding position and nextPosition to the constructor.
// src/Lexer.js

module.exports = class {
    constructor(input) {
        this.input = input
        this.position = 0
        this.nextPosition = 1
        this.char = input[0] || ''
    }
    // [...]
}
We also added a char property that will hold the current character we are processing in the input string. When the position holds a value of 0, the char property will be set to the first character in the input string (the input property).
As you can see, our char property is set to the first character in the input string and if there is no first character we'll default it to an empty string.

Let's go to the main part of our Lexer implementation — the nextToken method. Currently, it just returns a hard-coded integer token, but we need to return a token that matches the current character (the char property). It's better to see the code first, and then we'll walk through it together:
// src/Lexer.js

module.exports = class {
    // [...]

    nextToken() {
        let token = null

        if (this.char === ';') {
            token = new Token(tokens.SEMI, this.char)
        } else if (this.#charIsNumber()) {
            return new Token(tokens.INT, this.#readNumber())
        } else {
            token = new Token(tokens.ILLEGAL, this.char)
        }

        this.#advanceChar()

        return token
    }

    // [...]
}
At the heart of the nextToken method is an if-statement that compares the current character to different values. Currently, we are implementing logic for only 3 tokens, a semicolon, an integer and an illegal token.
If the current character is a semicolon, we will set the token variable to a semicolon token, advance the character to the next one and return a token.
Advancing the character will increment the position and nextPosition properties by one. So that the next time when we call the nextToken method, it will process the next character in the input.
If the current character is a number, we'll parse this number with the readNumber method and return a token representing the integer value. In any other case, our token will have a type of ILLEGAL, which means that the Lexer was unable to recognize the current character as a valid token.
You might be wondering, how exactly the readNumber method works, and why do we return the integer token instead of assigning it to the token variable as we do with a semicolon? We need to see how the readNumber works inside:
// src/Lexer.js

module.exports = class Lexer {
    // [...]

    #charIsNumber() {
        return /^-?\d+$/.test(this.char)
    }

    #advanceChar() {
        if (this.nextPosition >= this.input.length) {
            this.char = ''
        } else {
            this.char = this.input[this.nextPosition]
        }

        this.position = this.nextPosition
        this.nextPosition += 1
    }

    #readNumber() {
        let start = this.position

        while (this.#charIsNumber()) {
            this.#advanceChar()
        }

        return this.input.substring(start, this.position)
    }
}
Since these 3 helper methods are related only to the Lexer logic, I've made them private so that we don't expose them outside the Lexer class, this is what the hash symbol before the method name signifies.
In the readNumber everything is simple, we memorize the current position and advance the current character as long as the current character is a number. When we end-up on a non-numeric character, our position will point to the next character after the number. This is why we don't need to advance to the next token in the nextToken method, like we do with a semicolon.
As for the other 2 helper methods, charIsNumber and advanceChar, they are pretty self-explanatory.
If we run a node __tests__ command in our terminal, we'll get the "All tests are passed!" green output! With such a small amount of code, we'll be able to tokenize numbers and semicolons. Let's write another test simple test case to prove that the order of tokens doesn't matter:
// __tests__/Lexer.tests.js

module.exports = [
    // [...]
    {
        input: ';456',
        expect: [
            new Token(tokens.SEMI, ';'),
            new Token(tokens.INT, '456'),
        ],
    },
]
Great! Everything works! Let's move on to adding math operators to our lexer.
Adding Math Operators to the Lexer
Now that we have successfully implemented a lexer to tokenize numbers and semicolons, it's time to add support for math operators and an assign (=) symbol. You're going to be amazed by how easy it will be. We already have token types defined in the tokenTypes.js
// tokenTypes.js

module.exports = {
    // [...]
    PLUS: '+',
    MINUS: '-',
    MULTIPLY: '*',
    DIVIDE: '/',
    ASSIGN: '=',
}
Before we do that, let's write some tests first to see if they fail.
// __tests__/Lexer.test.js

module.exports = [
    // [...]
    {
        input: '13+12-5=20;',
        expect: [
            new Token(tokens.INT, '13'),
            new Token(tokens.PLUS, '+'),
            new Token(tokens.INT, '12'),
            new Token(tokens.MINUS, '-'),
            new Token(tokens.INT, '5'),
            new Token(tokens.ASSIGN, '='),
            new Token(tokens.INT, '20'),
            new Token(tokens.SEMI, ';'),
        ],
    },
    {
        input: '2*3/2=3;',
        expect: [
            new Token(tokens.INT, '2'),
            new Token(tokens.MULTIPLY, '*'),
            new Token(tokens.INT, '3'),
            new Token(tokens.DIVIDE, '/'),
            new Token(tokens.INT, '2'),
            new Token(tokens.ASSIGN, '='),
            new Token(tokens.INT, '3'),
            new Token(tokens.SEMI, ';'),
        ],
    },
]
If we run the tests now, we should expect them to fail because we haven't implemented the logic to tokenize math operators yet. Try to add support for these operators by yourself by going to the nextToken method. When you are done, you can compare it to my example below.
Done? Here is the nextToken method with support for math operators:
// src/Lexer.js

    // [...]

    nextToken() {
        let token = null

        if (this.char === ';') {
            token = new Token(tokens.SEMI, this.char)
        } else if (this.char === '+') {
            token = new Token(tokens.PLUS, this.char)
        } else if (this.char === '-') {
            token = new Token(tokens.MINUS, this.char)
        } else if (this.char === '*') {
            token = new Token(tokens.MULTIPLY, this.char)
        } else if (this.char === '/') {
            token = new Token(tokens.DIVIDE, this.char)
        } else if (this.char === '=') {
            token = new Token(tokens.ASSIGN, this.char)
        } else if (this.#charIsNumber()) {
            return new Token(tokens.INT, this.#readNumber())
        } else {
            token = new Token(tokens.ILLEGAL, this.char)
        }

        this.#advanceChar()

        return token
    }

    // [...]
Our tests are green again! You can see more if-statements where we check for different math operators like addition, subtraction, multiplication, etc. In each if-statement, we check the current character and if it matches the math operator, we add the corresponding token to the tokens array.
At this point, we are done! We can do tokenize strings like 24+2/32-42=23 and our lexer will tokenize it into separate tokens representing numbers, math operators, and the "assign" symbol. But, I would love to make even better improvements to our lexer.
Firstly, our input cannot have tabs and spaces because our lexer doesn't know anything about them. Secondly, I would love to use the equal (==) token instead of assign (=) for comparison operations, so we could write something like 25 + 3 == 28. Plus, we can add variables.
Removing whitespace from the Lexer
I'm going to reuse those 2 last tests that we have with math expressions and add spaces between the numbers and operators. Instead of 13+12-5=20; we need 13 + 12 - 5 = 20; because it's more readable. As for expected tokens, we expect them to be the same as before because our spaces will be ignored.
As for the second test, instead of 2*3/2=3; I want to have 2 * 3 / 2 = 3;, with a tab character before the first number. Just to make sure, we ignore all the tabs.
// __tests__/Lexer.test.js

    // [...]
    {
        input: '13 + 12 - 5  =   20;',
        expect: [
            new Token(tokens.INT, '13'),
            new Token(tokens.PLUS, '+'),
            new Token(tokens.INT, '12'),
            new Token(tokens.MINUS, '-'),
            new Token(tokens.INT, '5'),
            new Token(tokens.ASSIGN, '='),
            new Token(tokens.INT, '20'),
            new Token(tokens.SEMI, ';'),
        ],
    },
    {
        input: '    2 * 3 / 2 = 3;',
        expect: [
            new Token(tokens.INT, '2'),
            new Token(tokens.MULTIPLY, '*'),
            new Token(tokens.INT, '3'),
            new Token(tokens.DIVIDE, '/'),
            new Token(tokens.INT, '2'),
            new Token(tokens.ASSIGN, '='),
            new Token(tokens.INT, '3'),
            new Token(tokens.SEMI, ';'),
        ],
    },
]
When we run our tests, they fail because we expect { type: '+', literal: '+' } but instead got { type: 'ILLEGAL', literal: ' ' }, it's because we don't recognize whitespace characters as tokens in our lexer. I'm going to create a private method, skipWhitespace with an empty body, for now:
// src/Lexer.js

    // [...]

    #skipWhitespace() {
        // todo: implement
    }

    // [...]
It will be called on the first line of our nextToken method:
// src/Lexer.js

    // [...]

    nextToken() {
        this.#skipWhitespace()

        // [...]
The reason I haven't implemented the skipWhitespace method yet is because I'd like you to think about how you would approach this problem. Try to write your implementation. Think about it, when nextToken is called, our char property contains the current character that we need to analyze. What should we do if the current character is a space, tab or a new line?
Write your own skipWhitespace method implementation, and if it's wrong, you can just see the correct result and understand the approach.
So, this is what I would do. The first step is to check if the current character is a space, tab, or newline. If the current char is whitespace, we can just skip it by calling an advanceChar method. The issue appears if we have multiple consecutive whitespace characters. To handle multiple consecutive whitespace characters, we can create a while-loop that will advance the char until we encounter a non-whitespace character.
// src/Lexer.js

    // [...]

    #skipWhitespace() {
        while (this.char === ' ' || this.char === '\t' || this.char === '\n' || this.char === '\r') {
            this.#advanceChar()
        }
    }

    // [...]
With this method in place, our tests are green again, and we have successfully removed whitespace from our lexer. Great job! Isn't it magical how a few lines of code can make our lexer more robust and accurately tokenize input, even when there are whitespace characters present?
Adding double equal (==) support
Now that we have successfully implemented whitespace handling in our lexer, let's move on to adding support for the double equal (==) operator. As always, we start by writing tests for the functionality we want to add.
// __tests__/Lexer.test.js

    // [...]

    {
        input: '23 + 23 == 46;',
        expect: [
            new Token(tokens.INT, '23'),
            new Token(tokens.PLUS, '+'),
            new Token(tokens.INT, '23'),
            new Token(tokens.EQUAL, '=='),
            new Token(tokens.INT, '46'),
            new Token(tokens.SEMI, ';'),
        ],
    },
]
Since tokens.EQUAL doesn't exist in our current implementation, let's add EQUAL: '==', to our src/tokenTypes.js.
Our tests failed because we expected "==" but instead we got "=". It happens because our current implementation treats "==" as two separate tokens, "=" and "=". To resolve this issue, we need to modify our lexer to say that if the current character is "=" and the next character is also "=", we should treat them as a single token representing the "==" operator. Otherwise, we can treat the equal sign as a "=" token.
To make things more readable and maintainable, let's create a new private method called peekChar that will return the next character in the input without advancing the current position.
// src/Lexer.js

    // [...]

    #peekChar() {
        if (this.nextPosition >= this.input.length) {
            return null
        }

        return this.input[this.nextPosition]
    }
}
Now, go back to the nextToken method and change the line that checks if the current character is an equal sign:
// src/Lexer.js

        // [...]
        } else if (this.char === '=') {
            token = this.#chooseEqualToken()
        } else if (this.#charIsNumber()) {
        // [...]
Instead of assigning the token variable to an ASSIGN token, we want to choose dynamically between an EQUAL token and an ASSIGN token, depending on whether the next character is also an equal sign. To implement this, we can create a new method called chooseEqualToken that will check if the next character is also an equal sign.
// src/Lexer.js

    // [...]

    #chooseEqualToken() {
        if (this.#peekChar() == '=') {
            this.#advanceChar()
            return new Token(tokens.EQUAL, "==")
        }

        return new Token(tokens.ASSIGN, "=")
    }
}
As you can see, this method is straightforward, no explanation is needed. Guess what's going to happen when you run the node __tests__ command? Our tests should pass now!
Adding variables support
So far, so good! Our tokenizer is working well for handling whitespace and the double equal operator. Let's make it look more like a programming language rather than just a sequence of characters. I want our lexer to parse lines like num = 46;. As usual, let's start with tests:
// __tests__/Lexer.test.js

    // [...]
    {
        input: 'num = 46;',
        expect: [
            new Token(tokens.IDENT, 'num'),
            new Token(tokens.ASSIGN, '='),
            new Token(tokens.INT, '46'),
            new Token(tokens.SEMI, ';'),
        ],
    },
    {
        input: 'userAge = 22;',
        expect: [
            new Token(tokens.IDENT, 'userAge'),
            new Token(tokens.ASSIGN, '='),
            new Token(tokens.INT, '22'),
            new Token(tokens.SEMI, ';'),
        ],
    },
]
Tests now fail because we expect a { type: 'IDENT', literal: 'num' } token, but got { type: 'ILLEGAL', literal: 'n' }. Well, adding support for identifiers is as easy as adding support for numbers. We do the same thing we did for numbers - extend the if/else block in the nextToken method and define a couple of helper methods.
First, let's extend the if/else block in the nextToken method right after, where we check if the character is a number:
// src/Lexer.js

        // [...]
        } else if (this.#charIsLetter()) {
            return new Token(tokens.IDENT, this.#readIdentifier())
        } else {
            token = new Token(tokens.ILLEGAL, this.char)
        }

        this.#advanceChar()

        return token
    }

    // [...]
If the current character is a letter, we return an IDENT token type with a value equal to the whole identifier. The charIsLetter method is a simple one-liner:
// src/Lexer.js

    // [...]

    #charIsLetter() {
        return this.char.match(/[a-z]/i)
    }

    // [...]
We could just use this.char.match(/[a-z]/i), but this is not as readable as the this.charIsLetter() method call. By creating a simple charIsLetter method, we improve the readability of our code and emphasize that we are checking if the current character is a letter.
As for readIdentifier method, it's the same as readNumber except for the while loop condition:
// src/Lexer.js

    // [...]

    #readIdentifier() {
        let start = this.position

        while (this.#charIsLetter()) {
            this.#advanceChar()
        }

        return this.input.substring(start, this.position)
    }

    // [...]
Do our tests pass? Yes, our tests should pass now that we have added support for identifiers in our lexer. We've achieved what we wanted at the beginning of this article.
Additional tests
We are just about done with our simple Lexer, but, I would like to suggest adding 2 additional tests to ensure that our Lexer is handling all the cases correctly. They should already pass, since we will not introduce any new tokens.
The first one is to test the Illegal token:
// __tests__/Lexer.test.js

    // [...]
    {
        input: '!',
        expect: [new Token(tokens.ILLEGAL, '!')],
    },
]
The second one to test multiline code:
// __tests__/Lexer.test.js

    // [...]
    {
        input: `
            x = 42;
            y = 3;
            x + y == 45;
        `,
        expect: [
            new Token(tokens.IDENT, 'x'),
            new Token(tokens.ASSIGN, '='),
            new Token(tokens.INT, '42'),
            new Token(tokens.SEMI, ';'),
            new Token(tokens.IDENT, 'y'),
            new Token(tokens.ASSIGN, '='),
            new Token(tokens.INT, '3'),
            new Token(tokens.SEMI, ';'),
            new Token(tokens.IDENT, 'x'),
            new Token(tokens.PLUS, '+'),
            new Token(tokens.IDENT, 'y'),
            new Token(tokens.EQUAL, '=='),
            new Token(tokens.INT, '45'),
            new Token(tokens.SEMI, ';'),
        ],
    },
]
Great! If we run the tests, they should pass as before.
Conclusion
In conclusion, we have successfully developed a simple Lexer in JavaScript that can tokenize source code into a stream of tokens. We started by implementing support for numbers and then extended it to handle identifiers as well. By using if/else blocks and helper methods, we were able to accurately distinguish between different token types and assign them appropriate values.
Throughout the development process, our Lexer can properly tokenize various types of code including numbers, identifiers, math operations and semicolons.
To ensure the correctness of our Lexer, we also added additional tests to cover potential edge cases, such as illegal tokens and multiline code. Overall, our Lexer implementation demonstrated the importance of readability and code organization.
Ideally, for writing Tokenizers, we should strive to use programming languages with strong type systems and good performance characteristics, but for the sake of simplicity, I've chosen JavaScript as the programming language for this tutorial.
If you find this article useful, consider leaving a comment down below to let me know that a great understanding of Lexer development has been achieved. Thank you for reading.
Resources
Throughout my entire programming career, I have found that building your lexer can be a rewarding and valuable learning experience. There are several resources that I rely on to help me along the way. Here are some of them:
Udemy's course: Building a Parser from Scratch
This Udemy course by Dmitry Soshnikov is a great resource for learning about lexers and parsers from scratch. I watched it twice, it's that good!
The Book: Writing An Interpreter In Go
A book by Thorsten Ball, “Writing An Interpreter In Go”, provides a step-by-step guide to building an interpreter from scratch, including lexer implementation.
YouTube playlist: Creating a Compiler
In addition, I want to share an interesting playlist that I found on YouTube called “Creating a Compiler” for people who love YouTube. Just an intriguing playlist that, I think, is worth watching if you are interested in building compilers.
Keywords: tokenizer, parsing, lexing, thorsten, ball