Introduction
Telegram is one of the most popular messengers out there. Its popularity is spreading with a lightning speed as people moving from less secure messengers. Writing a chatbot for Telegram is probably much easier and faster than writing it for other messengers. We're going to use BotMan for writing a bot because it's a well-written library that supports many cool features that I'm interested in.
The coolest feature, in my opinion, is conversations. Conversation allows you to gather information from a user in a question-answer manner. It's when you ask for a phone number, the user sends it to you, and you save it. You ask for an email, the user sends it to you, and you save it. And you keep going until you have all the information needed.
You can make it so that gathering information looks like a real conversation. Asking "📱 What is your phone number?" instead of just “Enter your phone number in a box below” feels more real. The first message reads more natural, while the second one reads more robotic.
Apart from the BotMan, there are other libraries for creating a chatbot in Telegram, but in my opinion, BotMan is the best choice. At least currently, I'm writing this article.
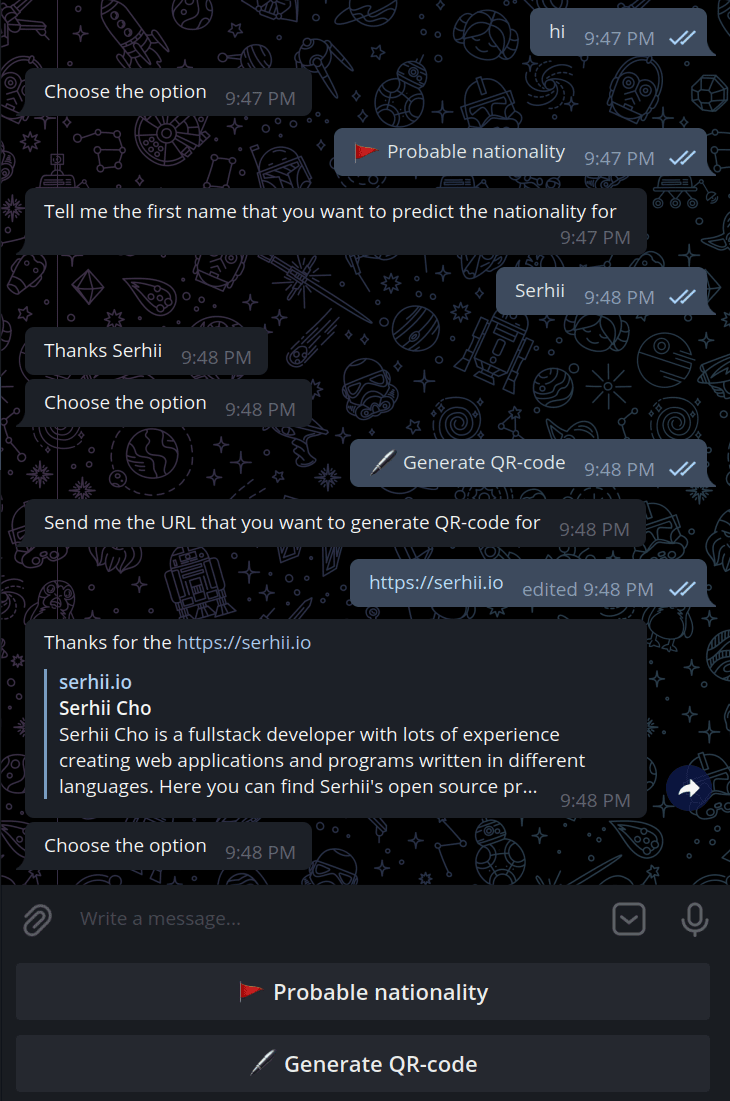
Our bot is going to have 2 keyboard buttons. The first button will ask for a name, and as a result, it will return the probable nationalities for a given name. The second button will take the URL and return a QR-code image that points to the given URL.
If you don't know what keyboard buttons are, they look like this:

In this article, I'm assuming you already know what bots are and what is Telegram. I also expect some knowledge of the Laravel framework and PHP in general.
Create a chatbot
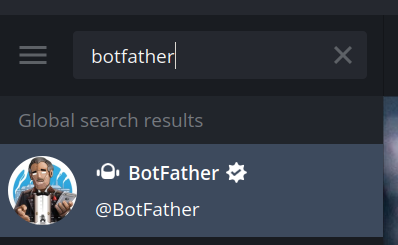
Head over to a Telegram and search for the botfather.
This is a special bot that allows you to create and configure your bot. Let's use /newbot command and give it a name. I'll call mine "Alex" with the username fgfdgdfgdfg_bot. After creating it, copy the token from the message you've got.

In my case, the token is 2001975695:AAGi6p8v5M2OjIuneLTJrbYFPNSVcrpa3Os, we'll use this token to send messages from our program. I'll delete this bot after the article is published, so I don't need to hide the token, but you need. Click on the link that starts with t.me/ in this message, and you'll find your newly created bot.
If you press the /start button, nothing is going to happen. It's because it doesn't know where to send the request. So let's create a dev server and connect it with the bot.
HTTPS server
For building a Telegram bot, we'll need an HTTP server with SSL certificates. I'll use Ngrok program that is going to deal with all of that for me. What is Ngrok? Ngrok is a secure tunnel to localhost that gives you a URL with HTTPS that you can use as a webhook for Telegram. You can install Ngrok on Linux by running:
sudo snap install ngrokYou can install Ngrok on macOS with Homebrew by running:
brew install ngrokSetting up the project
BotMan studio is a Laravel application with BotMan dependency and other nice tools for building and configuring chatbots. The only problem with it is that it always outdated. In this tutorial, we're not going to use BotMan studio because we want to have the latest Laravel and PHP versions.
Let's create a new Laravel project. I'll call the bot Alex. The current version of Laravel is v10.39.0 presently I'm writing this article. If you have troubles with installing Laravel, go ahead and visit the official documentation.
laravel new alex && cd alexRequire BotMan library and Telegram driver for it.
composer require botman/driver-telegram botman/botmanAdd bot token to your .env file.
TELEGRAM_TOKEN=2001975695:AAGi6p8v5M2OjIuneLTJrbYFPNSVcrpa3OsDon't forget to add TELEGRAM_TOKEN variable without value to .env.example file.
TELEGRAM_TOKEN=Create config/botman.php configuration file:
return [
    'telegram_token' => env('TELEGRAM_TOKEN'),
];
Set the webhook command
Before we make our first interaction with the bot, we need to set up the webhook. Telegram needs to know the endpoint which it has to send the messages to. Moreover, it would be wonderful to have a flexibility to change the given endpoint whenever we need. Because in development, the endpoint is different from production. Moreover, Ngrok generates a different URL for each session.
Thankfully, Laravel has custom artisan commands that you can create.
php artisan make:command SetWebhookCommand --command "bot:set-webhook {url}"Let's open the SetWebhookCommand file that we've created. The first thing that I always do when I create a new PHP file, I declare strict_types equal to 1, and then remove comment blocks that don't bring any value to the code. In this class, comments and constructor are redundant. Here is the code after all the corrections:
<?php

declare(strict_types=1);

namespace App\Console\Commands;

use Illuminate\Console\Command;

class SetWebhookCommand extends Command
{
    protected $signature = 'bot:set-webhook {url}';
    protected $description = 'Sets the telegram webhook to the given URL';

    public function handle(): void
    {
        //
    }
}
Nice and simple code without any noise. Method handle will be responsible for sending a request to a Telegram server to set the webhook URL.
public function handle(): void
{
    $token = config('botman.telegram_token');
    $url = $this->argument('url');

    $response = Http::post("https://api.telegram.org/bot$token/setWebhook", compact('url'));

    $this->info($response->json('description', 'Unknown error'));
}
Let's run php artisan serve and ngrok http 8000 commands and copy the forwarding URL from Ngrok output that starts with https.
ngrok by @inconshreveable                                                                     (Ctrl+C to quit)

Session Status                online
Session Expires               1 hour, 59 minutes
Version                       2.3.40
Region                        United States (us)
Web Interface                 http://127.0.0.1:4040
Forwarding                    http://4f1d-193-106-63-14.ngrok.io -> http://localhost:8000
Forwarding                    https://4f1d-193-106-63-14.ngrok.io -> http://localhost:8000

Connections                   ttl     opn     rt1     rt5     p50     p90
                              0       0       0.00    0.00    0.00    0.00
In my case, the webhook URL is https://4f1d-193-106-63-14.ngrok.io. That's what we need to provide to our artisan command with appending /bot route because it's going to be an entry point for all the requests from Telegram.
php artisan bot:set-webhook https://4f1d-193-106-63-14.ngrok.io/botNote. Note. On each Ngrok session you'll need to set the webhook again because the HTTPS endpoint is always going to be different. Moreover, the session expires in 2 hours anyway, and you'll have to start a new one.
First interaction
Let's make so that when someone starts a chat with the bot, we'll send a welcoming message to them. We'll need a controller and route.
php artisan make:controller BotController --invokableI'm creating an invokable controller because we need only one entry. The entry will be the only public method in the controller, all the other methods will be private. Add the route to web.php file:
<?php

use Illuminate\Support\Facades\Route;
use App\Http\Controllers\BotController;

Route::match(['get', 'post'], 'bot', BotController::class);
And also we need to exclude CSRF token verification for the /bot route.
class VerifyCsrfToken extends Middleware
{
    /**
     * The URIs that should be excluded from CSRF verification.
     *
     * @var array
     */
    protected $except = [
        'bot',
    ];
}
Another important step is to tell BotMan to use the Telegram driver. Because the library supports plenty of drivers. Telegram is just one of them.
Go into the AppServiceProvider.php and add the following to the boot method:
public function boot(): void
{
    DriverManager::loadDriver(TelegramDriver::class);
}
In the BotController we'll put a greeting when a person sends us any text message. __invoke method is our entry point.
<?php

namespace App\Http\Controllers;

use BotMan\BotMan\BotMan;

class BotController extends Controller
{
    public function __invoke(): void
    {
        $botman = app('botman');

        $botman->fallback(function (BotMan $bot) {
            $bot->reply('Hello');
        });

        $botman->listen();
    }
}
Go to your bot and send any message. You should get the Hello message response from our program. If you don't get the message, make sure you did all the steps correctly.
The fallback method will execute the callback function if received message does not match with strings that we are listening. In our case, we don't have any listeners, so callback will be triggered each time.
Telegram buttons
Before we get into the conversations, let's add keyboard buttons that appear on the screen after the person joins the chat. I'm going to create a file app/Conversations/ButtonsConversation.php and instead of $bot->reply('Hello') I'll add $bot->startConversation(new ButtonsConversation()).
ButtonsConversation class extends Conversation from BotMan library. When conversation starts, the run method will be executed.
<?php

declare(strict_types=1);

namespace App\Conversations;

use BotMan\BotMan\Messages\Conversations\Conversation;
use BotMan\Drivers\Telegram\Extensions\Keyboard;
use BotMan\Drivers\Telegram\Extensions\KeyboardButton;

class ButtonsConversation extends Conversation
{
    public function run(): void
    {
        $keyboard = Keyboard::create()
            ->oneTimeKeyboard()
            ->type(Keyboard::TYPE_KEYBOARD)
            ->resizeKeyboard(true)
            ->addRow(KeyboardButton::create('🚩 Probable nationality'))
            ->addRow(KeyboardButton::create('🖊 Generate QR-code'));

        $this->ask('Choose the option', function (string $answer): void {
            $this->bot->reply("Your answer is $answer");
        }, $keyboard->toArray());
    }
}
Here, we're creating Telegram keyboard buttons with 2 rows and 1 button on each row. If you want to put 2 buttons on 1 row, you can do that as well. I usually do that when the text on buttons is short, but in this example 2 rows is perfect.

When we click on one of the buttons, we'll get the message back. If it doesn't work for you, check the output in the running Ngrok session. It should contain the log for all the requests. It will help you find a problem if you run into one of them.
HTTP Requests
-------------

POST /bot                      200 OK
POST /bot                      200 OK
Refactoring
Before we continue, I want to share with you one little advice that I've heard from Robert C. Martin. I haven't found the exact words, but the point is that, whenever you write a piece of code that works, you need to refactor it. Event though, this article is not about refactoring, I want to apply it here.
The thing that I would like to refactor, is to move magic strings to an enum. I've created a app/Enums/BotButtons.php file with the following:
namespace App\Enums;

enum BotButtons: string
{
    case NATIONALITY = '🚩 Probable nationality';
    case QR_CODE = '🖊 Generate QR-code';
}
In our run method, we can replace magic strings with enum types.
->addRow(KeyboardButton::create(BotButtons::NATIONALITY->value))
->addRow(KeyboardButton::create(BotButtons::QR_CODE->value));
Conversations
We need to create a conversation class for each of the buttons. It's because we want to ask the user about the link that we will convert to a QR-code. And in the second conversation, we'll ask for a first name.
So in our app/Conversations directory, I'll create a NationalityConversation and QrCodeConversation classes. They are both extending the Botman's Conversation class. It means that we need to implement the run method, that will be called each time when conversation starts.
Here is the NationalityConversation class:
<?php

declare(strict_types=1);

namespace App\Conversations;

use BotMan\BotMan\Messages\Conversations\Conversation;

class NationalityConversation extends Conversation
{
    public function run(): void
    {
        $question = 'Tell me the first name that you want to predict the nationality for';

        $this->ask($question, function (string $name): void {
            $response = $this->prepareResponse($name);

            $this->bot->reply($response);
            $this->bot->startConversation(new ButtonsConversation());
        });
    }

    private function prepareResponse(string $name): string
    {
        return "Thanks $name";
    }
}
In the run method, we ask the user about the first name and reply with the thanks message. If the user sends us, for example, "John", we'll reply with a message "Thanks John". We need it just to make sure that conversation works.
For the second conversation, the logic is mostly the same, except that we'll ask for a URL that the user wants to generate a QR-code for. That's how we as a question in BotMan:
<?php

declare(strict_types=1);

namespace App\Conversations;

use BotMan\BotMan\Messages\Conversations\Conversation;

class QrCodeConversation extends Conversation
{
    public function run(): void
    {
        $question = 'Send me the URL that you want to generate QR-code for';

        $this->ask($question, function (string $url): void {
            $response = $this->prepareResponse($url);

            $this->bot->reply($response);
            $this->bot->startConversation(new ButtonsConversation());
        });
    }

    private function prepareResponse(string $url): string
    {
        return "Thanks for the $url";
    }
}
I don't see anything that we could refactor, so we move on. The last important step for setting up the conversations is to actually call them from ButtonsConversation whenever the user clicks the button. I've created a method handleClick that starts a conversation between a user and our program.
private function handleClick(string $answer): void
{
    $conversation = match ($answer) {
        BotButtons::NATIONALITY->value => new NationalityConversation(),
        BotButtons::QR_CODE->value => new QrCodeConversation(),
        default => null,
    };

    if (!$conversation) {
        $this->bot->startConversation(new self());
        return;
    }

    $this->bot->startConversation($conversation);
}
The method is split in three blocks.
- We set the conversation depending on the user's answer.
- If the answer doesn't match what we want, we just show buttons again.
- Start required conversation.
We've also made the method private because we are not planning to use it outside the current class.
Now call this method in our run method.
$this->ask('Choose the option', function (string $answer): void {
    $this->handleClick($answer);
}, $keyboard->toArray());
Awesome, after testing it on Telegram we got the expected result.
Services
Let's create a Services directory with a service for each button and an interface for both of them. They should not depend on BotMan library, it's going to be separate services that we'll call inside our conversations.

Each of these classes will be responsible for fetching data from an API and returning the result to a user.
Tip. Tip. I like to think about services as abstractions around small processes. In other words, it's basically just a PHP class that handles only one thing, so that the functionality that the class provides, can be reused in multiple other parts of the app.
Tip. Tip. Service interface is not required for our program. We can easily achieve the same functionality without it. It's just an improvement for our code architecture. Because of the interface (contract), our program ensures that each service will have a handle method.
Let's actually write an interface first and let two services implement it.
// app/Services/Service.php
interface Service
{
    public function handle(): mixed;
}

// app/Services/NationalityService.php
class NationalityService implements Service
{
    public function handle(): mixed
    {
        return;
    }
}

// app/Services/QrCodeService.php
class QrCodeService implements Service
{
    public function handle(): mixed
    {
        return;
    }
}
Pretty straightforward interface with one method that returns a mixed type. For the testing purposes, we have just temporary returns that we'll change later.
Nationalize API
We can start adding real logic to the services. I found this API called Nationalize, and I thought it would be nice to use it in our tutorial for one Telegram button.
Note. Note. For the simplicity, we're going to ignore error handling in this part. In a real app, you should never do that. You should always expect errors from other services and make sure that you receive expected data.
Let's open the NationalityService.php and add the HTTP request to Nationalize API.
class NationalityService implements Service
{
private const URL = 'https://api.nationalize.io/?name=';
public function __construct(private string $first_name)
{
}
public function handle(): array
{
return Http::get(self::URL . $this->first_name)->json();
}
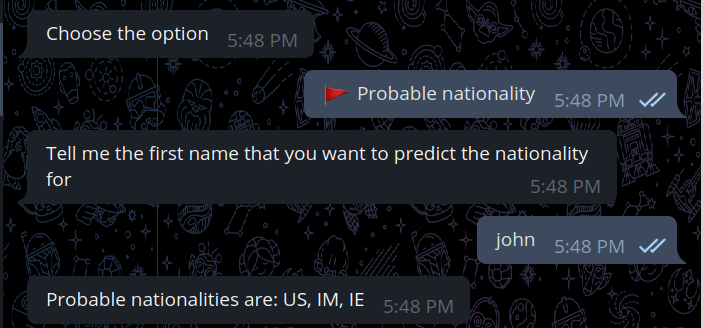
}If I send a request with the name john, in response I expect to receive the JSON:
{
   "name":"john",
   "country":[
      {
         "country_id":"US",
         "probability":0.048398225615958565
      },
      {
         "country_id":"IM",
         "probability":0.04438246053773764
      },
      {
         "country_id":"IE",
         "probability":0.042102085396037124
      }
   ]
}
In NationalityConversation.php I'll call this service in prepareResponse method and precess the response to get just country codes.
private function prepareResponse(string $name): string
{
    $service = new NationalityService($name);
    $response = $service->handle();

    $countries = array_column($response['country'], 'country_id');

    return 'Probable nationalities are: ' . implode(', ', $countries);
}
I got this output in Telegram app:
QR Server API
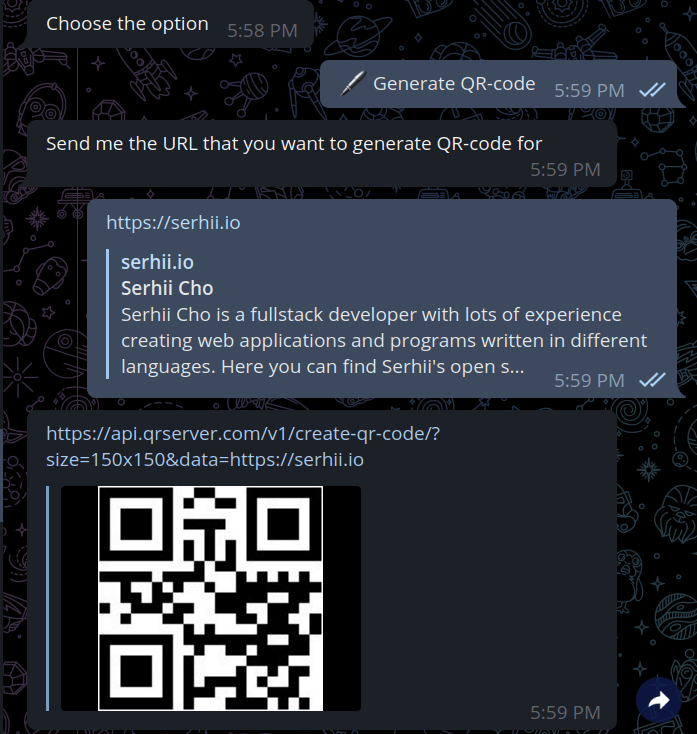
The second button is easier to make because we already know the pattern. Add logic to a service and call the service in QrCodeConversation class. Here is the QrCodeService.php:
class QrCodeService implements Service
{
    private const URL = 'https://api.qrserver.com/v1/create-qr-code/?size=150x150&data=';

    public function __construct(private string $url)
    {
    }

    public function handle(): string
    {
        return self::URL . $this->url;
    }
}
All it does is just returns the URL that points to a QR-code. In this case, I don't need the service class, but imagine that we have some logic there, like sending request. prepareResponse method in QrCodeConversation.php is also simple:
private function prepareResponse(string $url): string
{
    $service = new QrCodeService($url);
    return $service->handle();
}
After testing it on Telegram, I got the correct response.
Tip. If you are eager to learn more about Laravel and PHP, I highly recommend using Laracasts. I've been watching Laracasts for a while, and it's been growing very rapidly thanks to a remarkable team of content creators there.
Conclusion
We can see in practice that creating a bot for Telegram with the BotMan library is pretty straightforward once you understand the basics. In this article, I wanted to cover the inline buttons, but there is a lot more of what BotMan can make easy for us.
We've covered how to create a bot through the telegram app using BotFather. We've learned what Ngrok program is and how to use it. Likewise, we also added an artisan command that sets the webhook URL for a bot and wrote the program itself.
I've tried to give you some tips and notes to help you as much as I can. Bookmark this article to use it as a reference in the future. Thanks for your time.
🧑💻 Link to the source code on GitHub: github.com/SerhiiChoBlog/telegram-bot-alex
❤️ Thanks to Adem AY for the photo for this post.
Keywords: chat, ngrok, api, qr, backend