
Introduction
This article is a third article in the series "Git from Beginner to Advance". The previous articles provided a comprehensive overview of Git, but this one will focus specifically on understanding branching in Git.
Without branching, Git would not be as powerful of a version control system as it is. Especially in larger projects with multiple developers working on different features simultaneously, branching allows for parallel development and easy management of code changes.
To follow this article, you don't have to read the previous ones because we'll start from the fresh initiation with Git and move towards an understanding of branching. However, if you want to get something out of this article, I would recommend not just reading, but also following along with everything I'm going to do here. All you need for this is to create an empty directory and have Git installed on your machine.
Note. Later in this article, I will be calling the master branch as "main" to align with the latest terminology changes on GitHub. However, it's important to note that the term "master" is still commonly used. If you want to change a default branch name from "master" to "main" on your machine, you can open the .gitconfig file that is usually in your user's home directory and change the defaultBranch setting to main. On UNIX-based operating systems, this file will be found at ~/.gitconfig. Now, when you run git init, the default branch will be set to "main" instead.
Branches
Branches in Git are independent lines of development that allow multiple developers to work on different features or fixes simultaneously. Just like the branches of the tree, branches in Git diverge from a common starting point and can be merged back together when the work is complete.
Take a look at the following scheme which illustrates the concept of Git branches:

You have the main "master" branch, and 2 more branches, feature-1 and feature-2, which diverge from the master branch. You can name branches however you want, I named it feature-1 and feature-2 for simplicity, simulating concurrent work on different features or fixes.
Circles on the scheme represent commits that have been made on each branch. Instead of committing directly to the "main" branch, developers can create separate branches for their work, and commit to those branches instead. After they have finished their work, the changes can be merged back into the "main" branch, as you can see with 2 feature branches on the scheme.
You can think of branches as diverging paths in the development process, where different features or fixes can be worked on simultaneously without interfering with the "main" branch.
You will understand branches when we start working with them in practice. Let's start with preparing the place for it by initializing a new Git repository somewhere on your machine.
I'd also like to point out that unlike every single horror I've ever witnessed when looking closer at SCM products, git actually has a simple design, with stable and reasonably well-documented data structures. In fact, I'm a huge proponent of designing your code around the data, rather than the other way around, and I think it's one of the reasons git has been fairly successful.
Linux Torvalds (Creator of Git and Linux)

Initialize a New Git Repository
I'll create an empty directory and run git init to initialize a new Git repository. After initializing the Git repository, we are in the default branch "main". The default branch is a bit special, it cannot be deleted or simply renamed.
In a professional software development, programmers do not usually work directly on the "main" branch of a Git repository. Whatever issue you're trying to solve or feature you're trying to implement, it's best practice to create a new branch for that specific task.
I'll create a names.txt file in our project with 3 names from a list of people I know:
Michael
Olexey
Daria
I need this file to just simulate a simple project structure with a single file that has some content. We can now add this file to the staging area with the "add" command and commit the changes to the "main" branch. Don't forget to save the file if you don't have automatic saving enabled.
git add -A && git commit -m 'Create names.txt with 3 names'After running git log we can see our commit there with all the basic information about it:

Let's say that we want to add a new feature to this project by adding a person's age to the names listed in the "names.txt" file. Let's create a new branch.
Create a Git Branch
Creating a branch in Git can be done in 2 common ways:
git checkout -b <branch-name>(-b stands for "branch")git switch -c <branch-name>(-c stands for "create")
Which command to use is up to you and your personal preference, as for me, I prefer to use the git switch command as it provides a more explicit syntax, whereas the word "checkout" can sometimes be ambiguous.
Let's create a branch named "add-age" using the command:
git switch -c add-ageThe output says, "Switched to a new branch 'add-age'" in our terminal, and if we run git status we can see that we are now on the "add-age" branch.

To see the list of all created branches in your local Git repository, you can use the command git branch. To exit the branch list and return to the previous command prompt, simply press "q".
Now that we are in the "add-age" branch, we can make anything we want with our files independent of the "main" branch. Even if we delete the entire contents of the "names.txt" file or make other significant changes, it will not affect the "main" branch.
It means that at any point we can switch back to the "main" branch and the changes made in the "add-age" branch will not be visible. I hope you can see how useful branches can be, especially when you want to quickly brainstorm a new feature or experiment with different ideas without impacting the stability of the "main" code.
Because oftentimes, we just want to abandon the idea for different reasons and not merge the changes into the "main" branch.
Let's still add the age information to each name like this:
Michael 10
Olexey 33
Daria 31
After saving the file, we can stage and commit changes in one line command.
git add -A && git commit -m 'Add age to each person'After running git log, we should see 2 commits, one belongs to the "main" branch and the other belongs to the "add-age" branch.

Let's say that a new task comes in with a higher priority and needs to be addressed immediately. It could be something like a bug fix or a critical security issue. You need to know how to switch back to the "main" branch quickly and start working on the other task. Let's do that.
Switch between Branches
Let's imagine that you have to add a fourth name to the "names.txt" file and stop working on the "add-age" branch for now. We can just switch back to the "main" branch by using the command git switch main.
You should see a message "Switched to branch 'main'" in your terminal, but if you like, you could double-check it with git branch command. You can also notice that in our "names.txt" file we don't have any age information anymore because it was added on a different branch.
We'll create a new branch and call it something like "add-new-name" to start working on a new urgent task.
git switch -c add-new-nameAfter this command, the new branch "add-new-name" is created, and we are switched to it. I'll add a fourth name to the "names.txt" file. The "names.txt" should now look like this:
Michael
Olexey
Daria
Irina
Stage and commit:
git add -A && git commit -m 'Add fourth name'Now, if this were a proper workflow, we would push these changes to a remote repository for review and merge with the "main" branch. But, we haven't discussed any remote services yet, such as GitHub or GitLab.
It means that we need to merge the changes made in the "add-new-name" branch to the "main" branch locally.
Merge Branches
Merging in Git is the process of combining changes from different branches into a single branch, allowing for the integration of multiple sets of modifications into a unified codebase.
In simple words, merging branches in Git is like planning a road trip with friends. Each friend creates their own itinerary branch, representing different routes or plans. When merging branches, it's akin to combining everyone's ideas into a final itinerary, resolving conflicts like deciding between conflicting destinations. Once merged, the itinerary represents a unified plan for the trip, incorporating everyone's input.
Note. In professional software development, branches are commonly merged through services like GitHub, GitLab, Bitbucket, or other services that provide collaboration and version control features. It's done this way to ensure that the changes made in the branch are thoroughly reviewed and tested before they are merged into the "main" branch, preventing any potential conflicts or issues.
Let's apply merging to our example. To merge the changes made in the "add-new-name" branch to the "main" branch locally, we should first switch to the "main" branch by using the command git switch main.
Again, if we check "names.txt" we'll see only three names in the file because the fourth name was added on a different branch.
To merge the changes, we can run the Merge command:
git merge add-new-nameI get this output in my terminal:
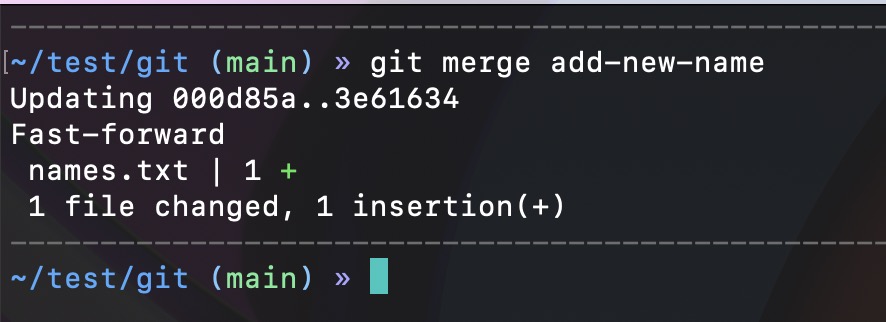
It shows, that the "names.txt" file had 1 line added. When we check the "names.txt" file now, we should see all four names included.
Let's continue working on adding age to each name in our "add-age" branch.
Resolving a Conflict
To go back to our "add-age" branch, we use the usual git switch add-age command. Notice that we still have 3 names here, with age information attached to each name. The state of this branch is separate from the "main" branch, and any changes made to the "main" branch will not affect the "add-age" branch, unless we merge changes from "main" to the "add-age".
Since we know that our "main" branch has recent changes which are not present in the "add-age" branch, we can merge the changes together by using the "merge" command again. This time, we will not switch to the "main" branch, but stay on the "add-age" because we want to merge the changes from "main" into "add-age" and not the opposite.
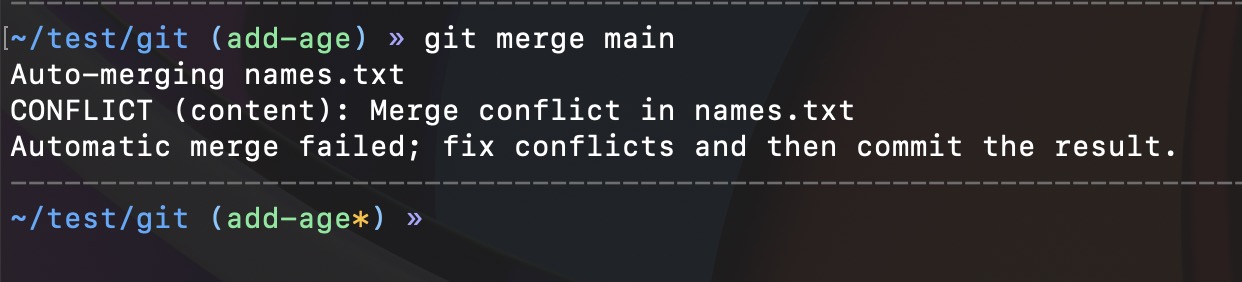
git merge mainAfter we run this command on the "add-age" branch, we should get a Git conflict that needs to be resolved.
Conflicts arise when Git cannot automatically merge two branches due to conflicting changes made in the same part of a file. Usually, it happens when 2 developers introduce changes to the same line of code in the same file, and Git doesn't know which modification to keep.
To solve the conflict, you just need to modify all the conflicting files to remove the conflicting lines and choose which version of the code to keep. In our case, we only have a single file, but in large projects you might have multiple files.
Use the git status command to see the conflict information.

We can see crucial information here, like git merge --abort to abort the merge and go back to the previous state before the merge attempt, which we don't need to run in our case.
We can also see that we need to fix conflicts and run the git commit command to finalize the merge process.
And the most important information shows us the list of conflicting files, which in our case is just one file, the "names.txt". Let's open this file and see what's going on there.
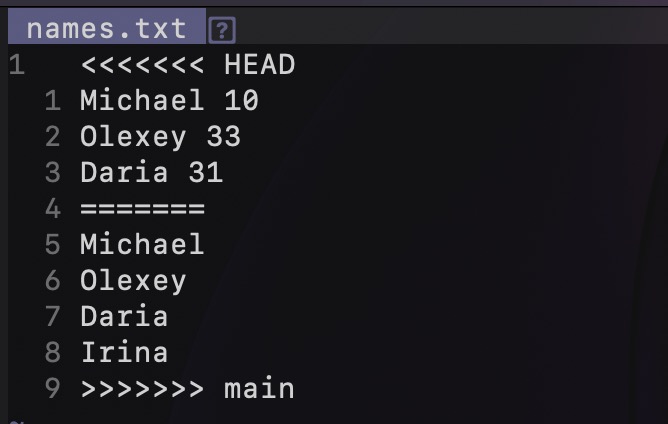
It might look scary at first, but once you understand it, resolving Git conflicts can be straightforward. For better readability, let me put 2 separate changes in different color:
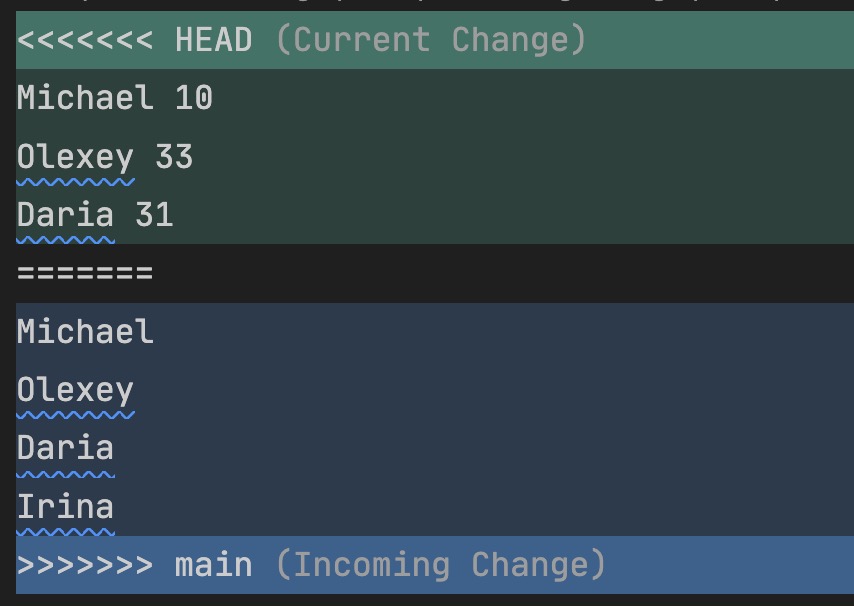
The text in blue color comes from the "main" branch, and the text in green color is your "add-age" branch. You need to delete text that you don't want to keep, and ensure that those lines and angle brackets are also removed.
In our case, we can go in two ways, whichever is easier for us. For example, we can delete the green text and add Irina to it, or we can delete the blue text and add Irina as a fourth name.
I'll delete the blue text with angle brackets and the ======= line to get just this:
And just add Irina 54 as the fourth line to it. To finish the process, we need to save the file, stage the changes and commit.
git add -A && git commit -m 'Add Irina 54 to names.txt file'Congratulations, you have officially resolved your first Git conflict. Allow me to explain in steps what we just did:
- Created the "add-age" branch and introduced changes to the "names.txt" file by adding age to each of 3 names.
- Since a new task arrived with higher priority, we switched to the "main" branch and created the "add-new-name" branch.
- In the "add-new-name" branch, we added a fourth name to the "names.txt" file.
- We then switched to the "main" branch and merged the "add-new-name" branch into it without any conflicts, since the changes made in the "add-new-name" branch did not overlap with the changes made in the "main".
- Now we are back in the "add-age" branch. Since our "main" branch is ahead of the "add-age" branch by one commit, we need to update our branch with the latest changes from the "main".
- We merged the "main" into the "add-age" branch to incorporate the latest changes.
- The merge process can't be done since we encountered a conflict between the changes made in the "add-age" branch and the latest changes in the "main" branch. For that, we resolve the conflict.
- After the conflict has been resolved, we stage changes and commit them.
I hope it's clear now how Git branching works, all you need is practice in real-world projects. Let's also learn about rebasing and the differences between merging and rebasing in Git.
Rebase VS Merge
Rebasing allows you to take the changes from one branch and apply them on top of another branch. It might seem as if you're rewriting history, as it moves the entire branch to a new base commit.
The task of rebase is the same as the merge, to combine the changes from one branch into another branch. The difference is that when you rebase a branch, you create a linear history. Take a look at the picture that underlines the differences between the "merge" and the "rebase" commands:

In blue color are the commits on the "main" branch and in red color are the commits on some development branch like "add-age" from our example. The purple commit is a new commit that combines the changes from both branches using the merge command.
- Merging: When you merge one branch into another, Git creates a new commit (in purple color on the screenshot) that combines the changes from both branches. This new commit has two parent commits, one from each branch, and represents the merge point. Merging is a non-destructive operation and preserves the commit history of both branches.
- Rebasing: Rebasing, on the other hand, moves the entire branch to begin at the tip of another branch. It effectively rewrites the commit history of the rebased branch, applying each commit from the rebased branch onto the tip of the target branch. This results in a linear history, as if the changes were made sequentially on top of the target branch. Rebasing can make the project history cleaner and easier to follow, but can cause conflicts if the rebased commits conflict with changes in the target branch.
Rebase Branches
For testing purposes, let's create another branch called "add-height" by running the command git switch -c add-height. I'll open the "names.txt" file and add height for each person so that my final "names.txt" file will look like this:
Michael 10 120cm
Olexey 33 171cm
Daria 31 164cm
Irina 54 165cm
Thereafter, we can save the file and run the command:
git add -A && git commit -m 'Add height to each person'Now that we are done with this branch, we can rebase it into the "main" branch. For that, we need to switch to the "main" branch and run this command:
git rebase add-heightIt should say something like "Successfully rebased and updated refs/heads/main". That's just about everything you need to know about rebasing branches to get started. Let's see what commands we can use to rename and delete branches in Git.
Delete and Rename Branches
As we've discussed earlier, the default branch cannot be deleted or renamed. Any other branch can be deleted or renamed at any moment using the respective Git commands.
Before deleting a branch, you must verify that you are on a different branch and not on the branch you intend to delete. After, you can run the "branch" command with the --delete or -D flag:
git branch -D branch-nameTip. You can use git switch - command to switch to a last visited branch. The "-" in this command refers to the previous branch you were on. For example, if I switch from the "main" branch to the "development" branch and then want to switch back to the "main", I can use the command git switch - for simplicity.
Renaming branches is also a straightforward process in Git, although, I don't remember when the last time I was doing that because I usually put some thinking into naming. But you can do it with this command:
git branch -m new-branch-nameYou need to run this command when you are on the branch you want to rename. If you are on the branch "test" and you wish to rename it to "test-2", you need to run:
git branch -m test-2Let's move on to the next section, where we will learn a special command that might save you a lot of time when working with Git, it's called "Stash".
Stash Changes
The Stash command in Git is used to temporarily store changes that are not ready to be committed yet, allowing you to switch to another branch or perform other operations without committing your changes. It's like putting aside your work in progress so you can come back to it later.
Imagine you're working on a big puzzle, but your friend suddenly asks you to play a game with them. You would rather not leave your puzzle unfinished, but you also want to have fun with your friend.
So, what do you do? You put your puzzle pieces in a special box called a "stash" where they'll be safe. Now you can play with your friend without worrying about losing any puzzle pieces. Later, when you're done playing, you can take your puzzle pieces out of the stash and continue working on your puzzle right where you left off.
In Git, the stash command works similarly. It helps you save your work temporarily so you can switch to another task or branch without losing any changes. Then, when you're ready, you can bring back your saved changes and continue working on them. It's like having a magic box to store your work until you're ready to use it again!
To stash uncommitted changes in Git, you can use the following command:
git stashAfter running this command, all of your uncommitted changes will be saved in a temporary stash and not going to be visible to you.
To get changes out of stash, you can use the command:
git stash popThis command will remove the most recently created stash and apply the changes to your current branch. There you go, use it wisely.
Conclusion
In conclusion, Git provides powerful features for managing branches, including creating new branches with git switch -c <branch-name> command or git checkout -b <branch-name>.
To switch between two different branches in Git, you can use the command git switch <branch-name> or git checkout <branch-name>. When you are done with the branch and want to combine changes from it into the "main" branch, you have several ways.
One way is to merge the branch into the "main" branch, and the second way is to rebase the branch onto the "main".
We also discussed how to delete and rename branches, use the Stash command to temporarily save changes.
Remember that Git was created for collaboration in software development. If you work alone, you will not encounter as many branching and merging scenarios as you would in a team setting. That's where the full power of Git comes into play, allowing teams to seamlessly collaborate on code and manage software projects efficiently.
I hope this article has provided you with a clear understanding of Git branches and how to use them. If you have any further questions or need clarification on any of the concepts discussed, feel free to ask in the comment section, I will quickly reply to your inquiries.
Keywords: github, git, torvalds, bitbucket, commit, open-source, stage